How to automatically show payments on Google Sheets through ClickPesa Webhooks
When you are a larger company and handling payments through a platform like ClickPesa, automating transaction logging is not just convenient, it is a large time-saver. This article will guide you through how to automatically receive mobile money and bank transaction confirmations in a Google Sheet. This is done setting up a Google Apps Script Web App that logs incoming payment webhooks to a Google Sheet. We will cover webhook formats, scripting and deployment.
1. What Are Webhooks?
Webhooks are HTTP callbacks triggered by an event in a third-party system (like a payment platform). When an event such as “PAYMENT RECEIVED” or “PAYMENT FAILED” occurs, the payment gateway sends a POST request to a URL you specify.
Example webhook payloads:
Payment Received
(Full spec: ClickPesa PAYMENT RECEIVED)
{
  "event": "PAYMENT RECEIVED",
  "data": {
    "paymentId": "PAY123456",
    "orderReference": "ORD987654",
    "collectedAmount": "10000.00",
    "collectedCurrency": "TZS",
    "status": "SUCCESS",
    "customer": {
      "name": "John Doe",
      "email": "john@example.com",
      "phone": "255700000000"
    },
    "createdAt": "2024-04-10T18:22:16.949Z",
    "updatedAt": "2024-04-10T18:22:56.153Z"
  }
}
Payment Failed
(Full spec: ClickPesa PAYMENT FAILED)
{
  "eventType": "PAYMENT FAILED",
  "data": {
    "id": "0969231256LCP2C95",
    "status": "FAILED",
    "orderReference": "0969231256",
    "message": "Insufficient balance",
    "updatedAt": "2024-04-11T04:58:31.036Z",
    "createdAt": "2024-04-11T04:58:31.036Z"
  }
}
You can view all webhook formats here: ClickPesa Webhook Docs
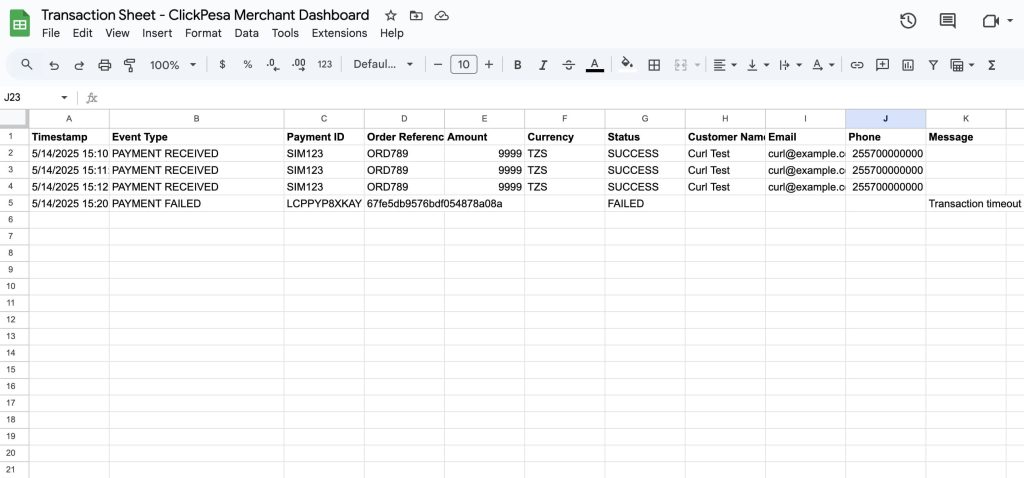
Our goal is to capture these transaction events and have them automatically appear into a Google Sheet.
2. Set Up Your Google Sheet
Open Google Sheets and create a sheet named “Sheet1” (or any other name you prefer). Set up your columns:
| Timestamp | Event Type | Payment ID | Order Reference | Amount | Currency | Status | Customer Name | Phone | Message |
You can customize this further, but this layout will allow you to track all key details. Find here the Template
3. Create the Google Script
Go to Extensions > Apps Script in your Google Sheet.
Paste the following code:
function doPost(e) {
  if (!e || !e.postData) {
    throw new Error("This function must be triggered by a POST request.");
  }

  const spreadsheet = SpreadsheetApp.openById("1mVIoG2LaVojwfBRkfKw1libR4KonhHYfYtlaQOZcRmo");
  const logSheet = spreadsheet.getSheetByName("Webhook Log") || spreadsheet.insertSheet("Webhook Log");
  const sheet = spreadsheet.getSheetByName("Sheet1");
  const now = new Date();
  let payload;

  try {
    payload = JSON.parse(e.postData.contents);
  } catch (err) {
    logSheet.appendRow([now, "Invalid JSON", e.postData.contents]);
    return ContentService.createTextOutput("Invalid JSON").setMimeType(ContentService.MimeType.TEXT);
  }

  // Log the raw JSON payload
  logSheet.appendRow([now, JSON.stringify(payload)]);

  const event = payload.event || payload.eventType;
  let row = [now];

  if (event === "PAYMENT RECEIVED") {
    const data = payload.data;
    row.push(
      event,
      data.paymentId,
      data.orderReference,
      data.collectedAmount,
      data.collectedCurrency,
      data.status,
      data.customer.name,
      data.customer.email,
      data.customer.phone,
      ""
    );
  } else if (event === "PAYMENT FAILED") {
    const data = payload.data;
    row.push(
      event,
      data.id,
      data.orderReference,
      "",
      "",
      data.status,
      "",
      "",
      "",
      data.message
    );
  } else {
    row.push("UNKNOWN EVENT");
  }

  sheet.appendRow(row);
  return ContentService.createTextOutput("OK").setMimeType(ContentService.MimeType.TEXT);
}
Code Explanation
- Handles incoming POST requests from your payment gateway
- Parses the request body and extracts key payment data
- Optionally verifies a secret token for security
- Appends the data as a new row in your Google Sheet
Gracefully handles success and failure responses
4. Deploy the Web App
- Click Deploy > Manage deployments
- Click New deployment
- Select Web App as the type
- Fill in the form:
- Description: “ClickPesa Transaction Logger”
- Execute as: Me
- Who has access: Anyone (or Anyone with the link, depending on your gateway)
- Click Deploy and authorize access
- Copy the Web App URL

This is the URL you will provide to ClickPesa or another gateway as your webhook endpoint.
5. Setting Up Webhooks in ClickPesa
To configure your webhook with ClickPesa:
- Access Webhooks Settings
Log in to your ClickPesa Dashboard.
Navigate to Settings → Developers.
Locate the Webhooks Settings section. - Add a Webhook URL
Select the event types you want to subscribe to, such as PAYMENT RECEIVED, or PAYMENT FAILED.
Enter your Web App URL - Receiving Webhook Calls
The gateway sends HTTP POST requests to your URL when events occur.
Your server (or script) must respond with a 2xx HTTP status code to acknowledge receipt.
For more: ClickPesa Webhook Setup
Now it works and you are ready to receive transaction confirmations in your sheet.
 ClickPesa Launches New Payment APIs in Tanzania